Posts

Showing posts from 2011

Perl EPO Glider 800

Image
Recently (by that i mean about 2 months ago) brought a glider from www.rchobbyaddict.com. Have finally managed to assemble it.  Here are some pics and a video of the glider. It uses a brush-less DC motor, 4 servo motors, and a 2S1P 800mah battery. Will give detailed specs in a post in one or 2 days after the flight.   

Ferrari Italia 458

Image
Undoubtedly the best looking Ferrari in the world. Made in 3Ds Max 2011. Rendering time: 55 mins/per frame @1080p Update : Last 3 images took 9 Hours at 3840x2160 ..

Quadrocopter - Part 8 - Failure

Image
The quadrocopter project was going fine till i decided to start soldering the circuit for the flight controller. I've burnt my hand countless times while soldering - frankly speaking im lousy at it - but this was worse. I was powering the circuit from the BEC (Battery Elimination Circuit) on one of my ESCs. As it happens due to the genius of my soldering technique i accidentally shorted the GND and the VCC of the BEC together and as soon as i connected the battery there was a crack sound and the inevitable distruction of the ESC. Thankfully we did have a spare ESC at home that was being used in a hovercraft project that my flatmate was working on so that got sorted. The Burnt-Up ESC. After that things got worse. The maiden test flight - not conducted by me - of the quadrocopter (done just by connecting the ESC's to the RF receiver with no gyros and no control circuitry) did not go well ...

Quadrocopter - Part 7 - Updates

Image
Its been about 2 months since I've written about anything on the blog. This was mainly because i got lazy and partly because i had nothing new to report. So now for the updates on the quadrocopter project. Firstly i got the pyramid ready and fixed on top of the  quadrocopter .This is how it looks: Note:The RF Remote in the pic is not the one im using now. This was just a temporary 9ch radio that the people at RCHobbyAddict.com sent me until the ones i ordered arrived. It was freaking awesome though. I also added some acrylic sheet pieces to be used as landing gear which was not a very good idea so i replaced them with some foam pieces - they work extremely well. I also measured the weight of the quadrocopter and it was about 1.7Kg (including 2 batteries). I then finally received the the RF transmitter and receiver that i ordered ( Hobby-King   2.4GHz FHSS 6Ch Tx-Rx   - Mode 2 )  from RCHobbyAddict.com at a...

Quadrocopter - Part 6 - Bringing Balance to the Force

Image
Its been about 2 weeks since i posted anything.So here are a few updates.The quadrocopter design is finally complete(well sort of) and so is the flight computer. The sensors (Wii Motion+  and Nunchuck) are here. They seem to be working. The ATMEGA328 (Arduino based) which is the main component of the flight computer also arrived about a week ago and worked flawlessly. This is all pretty cool but the main news is that I've finally ditched the name CPUV because i realized it sucked and now im going to name (Warning : Star Wars reference coming up) it "The Force". The flight computer is called Luke as it shall bring balance to the Force. Any more Star Wars references are welcome. Ok now that my moment of insanity is over , here are the designs: Right now I'm building the pyramid (reminds me of my very first blog post ) on top of the quadrocopter.I might try to change the ring i used for the base to something smaller when i actually start building the land...

Quadrocopter - Part 5 - Paisa Ye Kaisa

Image
 Here go a few updates on the quadcopter (CPUV) project. As mentioned in my previous post I will be using the Wii Motion Plus and  Wii Nunchuck for the IMU of the quadcopter to keep it stable.I ordered both of them recently from eBay and they just got delivered. Also i needed a micro-controller to manage the quadcopter's movements so i ordered an ATMEGA328 with an Arduino bootloader on it, again from eBay. I also ordered a spare battery , and a Hobby-King 6-Channel 2.4GHz FHSS Transmitter and Receiver from RCHobbyAddict. I shall explain i detail all these component choices in detail once i get the quadcopter to fly and write a complete build log along with the schematics and components. Now that i have purchased almost all the major components required for the quadcopter i just wanted to give the estimated cost of the entire project for someone looking to build one: It...

Paintball

Image
Here is the design of the automatic paintball gun that i'll be putting up on the quadcopter.

Quadrocopter - Part 4 - Spinning out of Control

Image
In the previous post i mentioned that i needed gyroscopic sensors and accelerometers to stabilize the quadrocopter.For more detail on these sensors visit  Gyroscope  and  Accelerometer . Basically what i'll be doing is using these sensors find out the orientation of the quadrocopter relative to the ground. With this data i can adjust the speed of the various motors (using something called as PID Controller ) to stabilize the quadrocopter in a particular orientation. Now to move the quadrocopter in any direction you adjust the speed of any one (or all) the motors so as to get the proper direction of motion. For more info on how a quadrocopter actually flys go  here. There are two ways (that i have thought of) to obtain these sensors:                1) Buy it off the self                2) Salvage it from any commercially avail...

Quadrocopter - Part 3 - Tied Down

Image
First of all the name. I've decided to go with CPUV (or Chatur-Pankh-Udaan-Vastu). Thanks Anshuman for suggesting that name. In the last post i mentioned that i was going to do a test flight and put up a video so here they are: For the test we (me and my roommate mudit ) initially decided to use a RF link to control the quadcopter but due to some technical difficulties (i.e laziness, unwillingness to work and a general lack of interest in actually doing so) we could not actually use that so we put a small program on an ATMEGA16 that initializes the motors and then gradually increases the speed of the motors till it reaches a maximum and then to minimum rather quickly and then repeats the process over and over again. Now the quadrocopter does not have any gyros or accelerometers as of now to stabilize it (More in part 4) therefore i had to tie it down to a table or else it would have taken of...

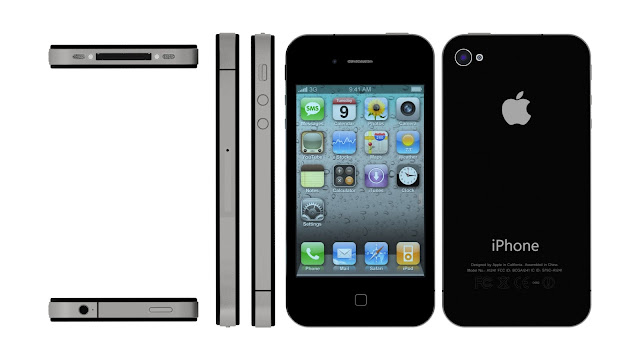
iPhone 4

Image
Renders of iPhone 4 made in 3DS Max 2011 using mental ray textures. 

Quadrocopter - Part 2 - Lighting It Up

Image
Ok i got a bit further with the qua, drocopter ( link to part 1 ) project. I've finished the wiring for the motors and added a few LED's. I've also mounted the propellers and decided on the the design of the landing gear. As far as the stuff still left to do the list goes as below: Flight Computer Gyros and Accelerometer for stabilization  Radio Control System software for monitoring telemetry I'm hoping ill have everything done by the middle of may. Will upload all schematics and code then. After that i'll try to add some more gadgetry to the quadrocopter such as: GPS Automatic Paintball gun Camera Mount with Pan-Tilt As far as the Accelerometers and Gyros i was thinking of going for the sensors on either the Nintendo Wii Motion Plus or the Sony PS3 Move controllers because they are way cheaper than buying off the shelf parts and will involve some sort of hacking. Now my roommate is  also building a quadrocopter and he decided to use the Ni...

Creating HDR Images using a normal (phone) camera

Image
I was getting a bit annoyed trying to explain a few people (you know who you are) that the iPhone camera is not different from their phone cameras (also having a 5MP sensor) and that with just a bit of hard-work they can also get HDR pictures. All u need is an app that does that for you ... Ok fine for all the people who do not want to install an app on their phone or want to create HDR using a normal "Digi-cam" there is another way. You can use Photoshop (or GIMP for you Open Source freaks) and make yourself a an HDR image. The process is fairly simple but this post is just for the above mentioned people and for all the others who are oblivious to the fact that this can actually be done. So is what u need :              1) A camera that has adjustable exposure settings               2) Photoshop or GIMP (why did they have to name it that?)          ...