Posts

Showing posts from 2013

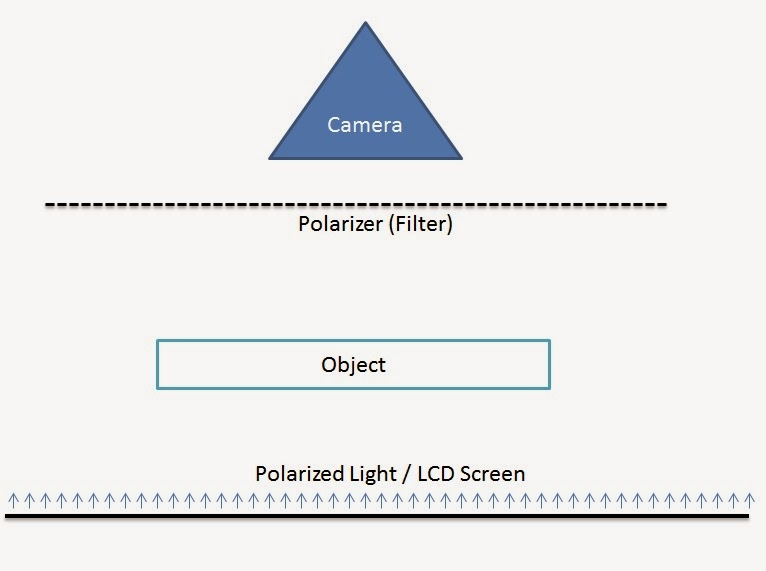
Jugaad Security System

Image
I own a book shop in Nainital and I live in a house just behind (attached to) the shop. As you enter my house there is a cupboard that we use to keep any spare cash (Small amounts that would be sent to the bank the next day) we might have form the day's sale. About 4 months back my mother started to notice money disappearing form the cupboard. First time my mum told me about the issue, I brushed it aside thinking it might have been a calculation error from our side. Then the same thing happened again another 2-3 times. This was more than a coincidence so we stopped using the cupboard for the purpose of keeping any sort of cash but we still did not know who was taking the money. We have a few staff members at our place (all of them had been with us for a considerable amount of time - some of whom had been working at our place for more than 20 years). Since the only people who had any access to the cupboard apart form the family were the staff member we suspected that one of them wa...

DIY Polariscope

Image
A few days ago I was stuck in one of those YouTube loops (happens once a month) and I came across this awesome video on the  Prince Rupert's Drop  by SmarterEveryDay (Excellent channel BTW). About 3:00 minutes into the video they use something called a Polariscope to check out the stresses built up inside the Prince Rupert's Drop. Watching that I realized that I had all the things needed to build this at home. You need the following things for creating a Polariscope : 1) A polarized light source (White in color preferably) - Since almost all LCD's use polarized light to display images you could use your iPad or Laptop screen displaying a white image. I went for my 22" monitor as I needed a bigger surface. 2) A transparent object - Not all objects work well for this as some don't really have that much stress.            - Things that work well - Glass statues, use and throw forks and knives, glue sticks, etc.   ...

Photoshop - Human Cloning Project

Image
A few days ago I posted this picture of myself on facebook Loads of people asked me how I did this so I decided to make step-by-step a tutorial. It is ridiculously easy. I was going to do a video on this but then decided against it as it would have taken a lot longer and currently I don't have that much time at hand. I'm quite busy with the work @  Mistri Labs Step 1: Setup your camera. You will need camera where you can set exposure manually (Aperture Priority and Shutter Priority will not work too well in this case as the light will vary was the subject moves in the frame). Most P&S and DSLRs have this feature. Even a decent phone camera should work (You might need to download an extra app to set the manual exposure on your phone). You will need a tripod (or any surface that you can place your cam on if you don't have a tripod). - Setup the ISO - Don't use auto because the light changes as you move around the room. - Setup the aperture - For all the p...

DIY MaKey MaKey

Image
I was just browsing around the internet and came across this video  which described how to make your own Makey Makey board using an  Arduino Leonardo . I had all the components laying around at home so I decided to make my own. Here is a video where i used 4 glasses of water to play some drums from  http://www.virtualdrumming.com/ . No I can't play music, well not right now anyway :-). The Makey makey is basically a circuit that converts anything conductive - even slightly conductive (Metal, Coins, Bananas, Humans, Coke Cans, Glass of Water, etc.) into a button on your keyboard. You connect a wire from the circuit to the object you want to make into a button (key). Connect your self to the wire from the circuit labeled "hand". Done. Now the moment you touch the object it will send a key-press (example 'a') to your computer via USB.  Using the Arduino Leonardo you can convert up-to 6 objects into a key at any given tim...

Macro Shots with a Canon 600D

Image
I recently bought a a Lens Reversal Ring   for my DSLR. It is a pretty nifty gadget available at dirt cheap prices. The way it works is you screw it on the filter thread of your lens and then mount the whole lens to your camera in a reverse orientation. What this essentially does is it converts your lens into a macro lens lens (You can focus on things that are super close to your lens). Obviously there are some disadvantages to this approach rather than getting a proper macro lens. Firstly as your lens is mounted in reverse you don't have any control over the electronics (So auto-focus). Secondly, in case of canon lenses (in Nikon it closes down) the lens opens up the widest aperture (with no control) which can be a problem some times as you get a really shallow DOF which causes issues sometimes. For the second issue there is a workaround and it works (well sort of - alteast on Canon 600D and other similar cameras). Lets say you want to click a pic with an aperture...

Guitar 3D

Image
I've been learning how to play the guitar for a few now days. As customary I had to render out a 3D image of one (not the exact guitar I'm learning on) I downloaded the basic structure of a guitar form some site a few days back (I forgot the link from where). Anyways it was a simple low poly model so I had made a lot of changes to the same. Refined the whole thing. Did the texturing, lighting and camera setup. After that rendered the whole thing out (took about 20 minutes for each image as 4K). The DOF was added later in Photoshop as rendering it out was too tedious.